• Skip to primary navigation
  • Skip to main content
  • Skip to primary sidebar

Mind in the Butter

Food for taste, buds, and family

  • Recipes
    • Appetizers & Snacks
    • Breakfast
    • Desserts
    • Dinner
    • Drinks & Cocktails
    • Instant Pot
    • Pasta & Grains
    • Salads & Vegetables
    • Seafood
    • Sides
    • Soups & Stews
  • Entertaining
    • Holidays
  • Life & Travel
  • Food & Sustainability

recipe

Seared Scallops and Fennel Risotto

October 16, 2018 by Eva Louise 1 Comment

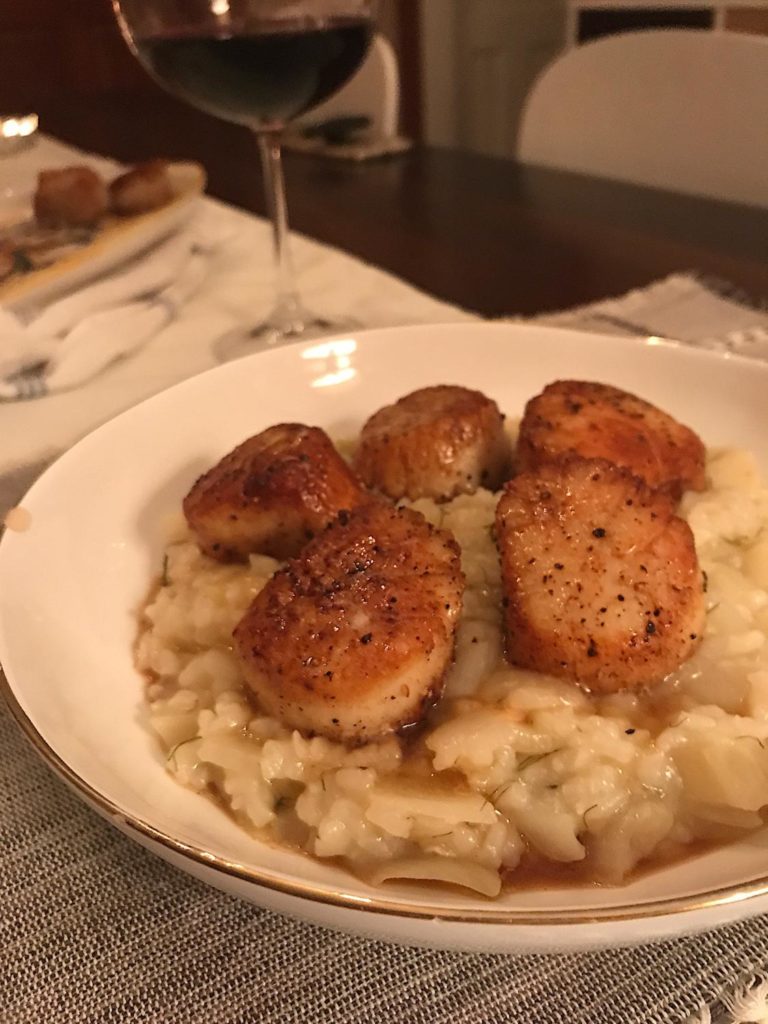
Nothing feels more triumphant than expertly mastering a difficult dish. For me, it’s my seared scallops and fennel risotto. And I know I’m awesome at it because it’s hands down the most requested dish I make for special occasions. I’ve been making (and perfecting) it for almost ten years and I think I’ve finally got it down. As for the risotto, this one features fennel but you could easily do a butternut squash and sage one, a beet root one, a pesto one…the list goes on.

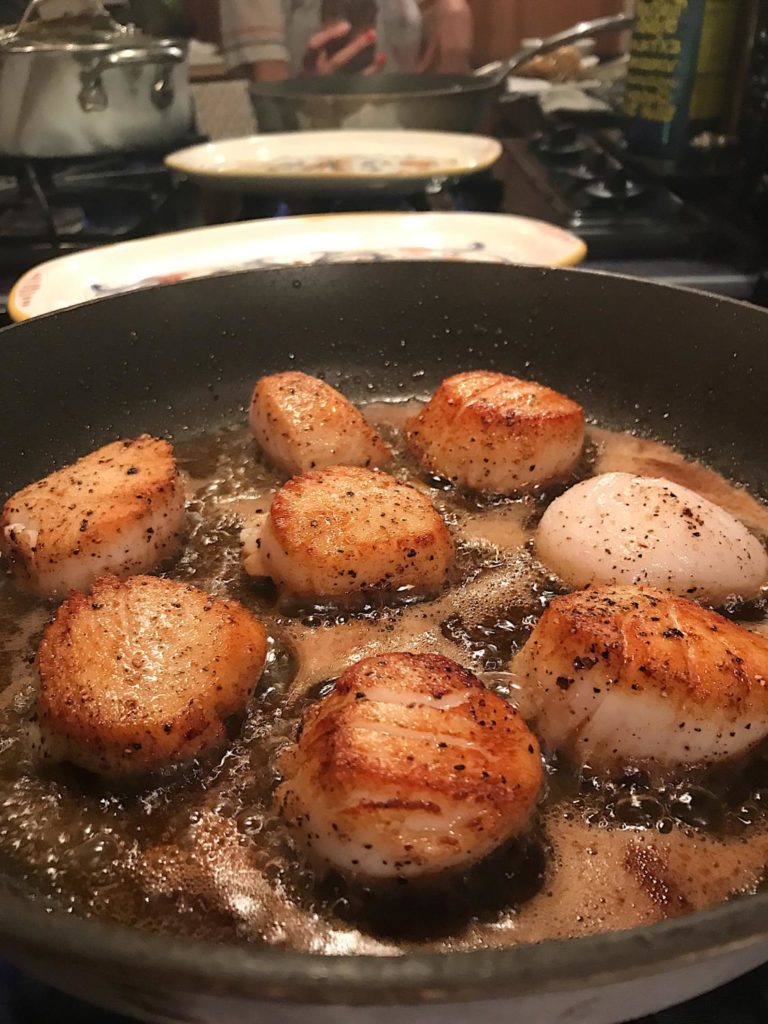
A note on the scallops, since you know, I’m like, THE expert. Searing scallops is not easy, it takes patience and a hot-ass pan. The trick is to not be afraid of the heat and to not be tempted to shake the pan or peek under the scallops before they are actually ready. The reward is crispy and tender scallops and a buttery, fragrant risotto. An important thing worth emphasizing: be sure to get “dry” or “diver” day boat scallops. Fishmongers often store scallops (and most seafood) in a salt solution to maintain freshness and make the appearance of the seafood more plump. Avoid this at all cost- and yes, day boat scallops are more expensive. If you don’t, that’s a one-way ticket to squishy, squeaky, wet scallops and you’ll get annoyed and curse me and never attempt these again.

Keep practicing with this one!

1 vote

Print

Seared Scallops and Fennel Risotto

Prep 45 mins

Cook 1 hour

Total 1 hour, 45 mins

Yield 2-4 servings

Ingredients

For the scallops

  • 1 pound (about 12- 15) dry day boat scallops
  • olive oil
  • salt and pepper to taste

For the risotto

  • 1 cup arborio (risotto) rice
  • 1 medium fennel bulb, cut into 1/2 inch cubes
  • 3-6 garlic gloves (per your preference)
  • 1 onion, cut into 1/2 inch cubes
  • 1 cup cheese from a block of good salty parmesan or pecorino
  • 1/2 cup good dry white wine
  • 6-8 cups chicken or vegetable stock
  • 3T ish olive oil
  • salt and pepper

Instructions

  1.  Line a cookie sheet or large platter with 2 layers of paper towel.
  2. Prepare the scallops by rinsing them thoroughly to remove sand and the muscle on the side of each scallop. This is a tough, fibrous piece that looks kind of like the tab on a soda can. Feed it to your cats or dog and make them happy.
  3. Place clean scallops on the paper towel-lined cookie sheet and dry as thoroughly as possible. They should be almost sticky they are so dry. Keep them on the paper towel and place in fridge.
  4. De-core and chop fennel into small 1/2 inch cubes. Fennel doesn't breakdown as much as an onion does when cooked so whatever size you chop it to, assume it will stay that size. Keep a few fronds for garnish at the end if you're feeling fancy.
  5. Chop onions; peel and slice or crush the garlic.
  6. In a dutch oven or large pot, heat a few tablespoons of olive oil. Once glistening, add the risotto rice and toast for about 3 minutes then add fennel, onion, salt, pepper and half your portion of garlic and sauté until onion and fennel are soft.
  7. In a separate saucepan, heat stock or broth and keep on low to simmer. More on this below.
  8. Take swig of wine, then deglaze pan with a good glug or 1/2 ish cup of it. Once wine has evaporated, ladle in one cup of warm broth into the risotto and continue to add a ladle at a time until each cup is absorbed by the rice.  Be patient with this step. It's kind of annoying but makes the risotto really creamy and tender without the cream! The risotto will tell you ultimately how many cups it needs so don't worry if you have a little broth left over in the small pot.
  9. Once risotto starts to soften (about 20 mins), add remaining garlic, a huge whack of good salty cheese, about 1/2 cup and check in on your salt and pepper levels.
  10. Start heating a large skillet (NOT a non stick one) for your scallops on high. Coat with 2 ish tablespoons of olive oil, depending on your skillet size. Pull scallops out of fridge and sprinkle one side with salt and pepper. Note: we waited to salt the scallops until the last second to avoid drawing water out of them. Goal is to keep them as dry as possible to get the best sear.
  11. Wet your finger under the faucet and flick water off your finger into the oil in the skillet. It should hiss, spit and pop when you do this. If it doesn't, wait and try again once pan is hotter.  Only when the skillet passes the water test, carefully place scallops seasoned side down into the pan.  Let sear for about 3-4 minutes and then flip. If the scallop is properly seared, it shouldn't stick to the pan and you should see the brown carmelization creeping up the side of the scallop. This takes practice. Finish second side for 2 mins and transfer scallops to a platter or just turn off the burner.
  12. Check on your risotto, adding any remaining stock to finish cooking the rice. If needed, add fresh crushed garlic, salt, pepper depending on what you think it needs. Garnish with some more cheese and the reserved fennel fronds.
  13. Spoon some creamy risotto onto a pretty plate with 4-6 scallops nestled on top and be sure to drizzle any scallop juice from the pan or plate onto the dish before serving.

Filed Under: Dinner, Pasta & Grains, Recipes, Seafood Tagged With: recipe, seafood

Put this in your pipe and smoke it! No, no, please just eat it with some cream cheese

August 23, 2013 by Eva Louise 4 Comments

candy1candy2

So you’re probably wondering, Evey, what’d you do with that Coho you slaughtered in your last post? I’ll tell you what we did, we made smoked salmon of course…we’re Jews after all…! Our smoked salmon is insanely delicious, meaty, brine-y and flavorful, not those slimy, thin, hot pink lox you get at the deli.  

accoutrements

All the accompaniments are just as essential as the smoked salmon: cream cheese, capers, red onion, tomatoes and lemons.

Obviously I’ll never make this in my New York apartment, but I would like to have this recipe on file. It’s funny because as I’m typing, I’m looking in the guest book of our Tofino house (we keep a guest book/journal every year so we can remember everything, recipes included) and apparently Dad calls this recipe his “Lil’ Chief Smoked Salmon Deluxe,” so we’ll continue to call it that.

Lil’ Chief Smoked Salmon Deluxe

salmonsalmon2

The process is quite long (about 13 hours door to door NOT including actually catching the fish) but nice and easy if you have the time and a smoker.  We start with a super intense brine with the ingredients below. Mom and Dad will adjust the recipe depending on what’s in fridge but you get the idea.  We leave the fillets to brine for about 4 hours in the fridge, then leave it to air dry on the counter until it forms the pellicle – that glossy, salty seal on the top of the fish which apparently helps the smoke adhere to the fish more effectively. Then we smoke it in our smoker (looks like a mini-bar fridge) for 6-8 hours at different temperatures (below). I might not be able to smoke the fish back in New York but I sure can eat it back in New York! Going to have to have you all over for brunch soon…

For the Brine

  • 1 cup water
  • 2 cups soy sauce
  • 1/4 cup non-iodized salt
  • 1/3 cup brown sugar
  • 1 cup dry white wine
  • 1/4 cup lemon juice
  • crushed garlic (knowing my family, a whole bulb)
  • onion powder or chopped onions

Smoke for:

  1. 1-2 hours at 100-120F
  2. 2-4 hours at 140F
  3. 1-2 hours at 175F

Filed Under: Breakfast, Dinner Tagged With: British Columbia, Canada, cooking, fish, food, recipe, salmon, seafood, smoking, tofino, tofino time

Moped Dinner Party in Switzerland

May 17, 2013 by Eva Louise Leave a Comment

le menuSometimes when I’m alone, eating bread rolls with packets of mayo drinking mini-bar wine  in my hotel bed watching Russian music videos, I think to myself  “business trips kind of suck.” But then I remind myself that most nights my life is fabulous and that I rule. Evidence of this is the incredible dinner party I had with some girlfriends and their beaus recently while on a business trip to Geneva.

Normally working late into the night, I committed to leaving the office  in time to hop on my friend, Cristina’s Moped and head to France to do some dinner party grocery shopping.  Holding tightly to her waist (apparently NOT necessary  which she made very clear to me), with the spring breeze blowing through my 2-piece suit, and our helmets bonking against one another with every windy turn, I knew this was exactly the 2-wheeled escape I needed.

Dinner Party

Eva’s Spring salad: rocket, shaved zucchini, cucumbers, chives, mozzarella with a lemon vinaigrette

My European friends are by default better cooks than I (because they are Europeans) , so I gladly took a step back on this meal and just offered to make a simple salad (above) while the girls  made seared duck breast with an apricot jam, mustard and soy sauce glaze, sauteed asparagus and roasted potatoes. Thank you, ladies for a truly decadent dinner escape!

Seared duck breast with roasted potatoes and asparagus

Seared duck breast with roasted potatoes and asparagus

I was excited so I made them do a group "haut cinq" with me (fake french for high five)

I was so excited by the success of the meal that I made them do a group “haut cinq” with me (my fake french for “high five”)

Filed Under: Life & Travel Tagged With: cooking, duck, food, France, friends, geneva, love, meat, recipe, salad, Switzerland, travel, vegetables

Lemon-Tahini Dressed Kale with Pine Nuts and Cranberries

April 28, 2013 by Eva Louise 1 Comment

kaleThese days I’m addicted to kale and totally over my normal vinaigrette go-tos: homemade apple cider and balsamic vinaigrette, so I tried my hand at a lemon-tahini dressing.  I always feed bad for that lonely can of tahini that sits in my fridge after I’ve gotten the urge to make humus–the only reason I can normally think to use sesame paste. With this new addition, that sad old can is put to good use with this kale salad tossed with toasted pine nuts and cranberries.

Lemon-Tahini Dressing

  • juice of 1 lemon
  • 1 heaping tablespoon tahini
  • 3 tablespoons of water
  • 1 tablespoon olive oil
  • pinch of salt
  • pinch of paprika
  • crushed garlic clove

Filed Under: Sides Tagged With: cooking, dressing, food, fruit, nuts, recipe, salad, vegan, vegetables, vegetarian

Rosemary Skewered Halibut

April 21, 2013 by Eva Louise 2 Comments

blog hLIBUT SKEWERSRecently, my mom gave me about a dozen rosemary branches from her garden. It was a lot of herb and I didn’t want it to go to waste, so I made this Rosemary Skewered Halibut. Rosemary is an intensely woody and lemony herb that I normally associate with meats, but Halibut is a pretty bland and trim fish, so the intensity of the rosemary actually worked quite nicely.  The halibut can easily be substituted for chicken, red meat, lamb or tuna, and since it’s almost summer, these skewers would be happiest when cooked on the grill.

The secret to this dish is marinating the halibut for at least 1 hour beforehand in a really intense herb blend. I tossed some fresh thyme, seasoned salt, paprika, garlic, Italian seasoning, herbs de provence, an herb mix containing dried chervil, parsley and coriander (pretty much the entire spice rack) and olive oil in a medium sized glass bowl and let it hang on the counter for about 10 minutes. If you try this recipe, the marinade should be almost pasty and super intense in flavor.

While the marinade rested, I rinsed and pat dry a beautiful filet of halibut and cubed it into 1 inch chunks, added it to the marinade bowl and chilled it for 1 hour.

I then heated the oven to 475 and lined a cookie sheet with tin foil and olive oil. With an entire stalk of rosemary, I laced 3-4 cubes of halibut down the rosemary from the bottom up and laid them on the cookie sheet so no halibut cubes were touching, then baked them for about 8-10 minutes until they were golden brown (they go fast, so keep on eye on them so they don’t  over cook).  Note: the rosemary edges will burn at this high heat.  This  is fine, but just have someone ready to do the “dish towel helicopter” under the smoke detector just in case.

I served the skewers with a kale salad and mushroom polenta and I can’t wait to get my hands on more fresh rosemary so I can do this again….

Filed Under: Dinner, Seafood Tagged With: cooking, dinner, food, halibut, herbs, recipe, seafood

Lovers and Friends: Beets and Goat Cheese

April 9, 2013 by Eva Louise 1 Comment

beetsBeets are fun to cook, I’ve decided. They gush a bloody red; they’re firm enough after they’re cooked that you can really play with them to create a beautiful presentation. Here, I made super easy gold and red beet stacks with creamy chive goat cheese and toasted pine nuts. The sweetness of the beets, the tang of the goat cheese and the bite from the chives are a dangerous trifecta of delicious. I’ll likely make these again soon, but in mini skewered versions for a cocktail party. Will report back after successful completion.

Gold and Red Beet Stacks with Chive Goat Cheese and Pine Nuts

  • 3 red beets
  • 2 large gold beets
  • 1 large log goat cheese, coldish room temperature
  • 1/4 cup of heavy cream
  • 1 bunch chives, finely chopped
  • some toasted pine nuts

1) Chop the tips off of the beets and boil whole until tender, about 20 minutes. A knife should easily go through them when ready. Place beets in bowl of ice water. Cool completely and peel. I’m not sure the proper way to peel a beet, but I ran my nail under the beet skin and it came off pretty easily, almost like peeling a boiled egg. Don’t do this if you’re a hand model before a photo shoot. Slice into 1/4 inch slices and set aside.

2) In a small bowl mix goat cheese and heavy cream, pouring small amounts of cream at a time to avoid it from splashing around. Fold in most of the chives, leaving some for garnish. It feels like you’re adding a lot, but chives have mild flavor. Add salt and pepper and taste.

3) In a small pan, toast 1 handful of pine nuts on medium heat until golden brown. Shake the pan frequently to avoid burning. Takes about 2-3 minutes.

4)  On a pretty plate, create the beet “stacks” by alternating 1 slice of beet and 1 dollop of cheese mixture, about three times. Get creative and make something pretty.

5) Garnish with chives and pine nuts and serve either as is, or with arugula, spinach or another tasty leafy green tossed with lemon juice and olive oil.

Filed Under: Sides Tagged With: appetizer, cheese, food, recipe, salad, spring

Halibut Top Ramen

February 27, 2013 by Eva Louise Leave a Comment

photo (11)Last week I did a post featuring a fried halibut sandwich with one of two halibut fillets we had. The fate of the second fillet is featured above– an Asian-style halibut soup with tender ramen noodles, shiitake mushrooms, leeks, baby bok choy…and about 100 herbs and spices. I really got into it and made the soup using my wok and a wooden sushi spoon as a ladle. (I’ll admit, I was even  a whisker away from wearing a Hello Kitty apron…)

Like many of my recipes, the ingredients are interchangeable but the trick here is  to layer them properly to get the right depth of flavor and the right consistency (ie not mushy, not too salty or bland). So below I’ve outlined, not a recipe, but conceptual steps to take to make a tasty Asian-style soup.

aromatics/sturdy vegetables and proteins + seasonings and oils + broth +  noodles +  delicate vegetables and fish + serve+ garnish = so awesome.

Step 1: Saute mushrooms and aromatics (onions, garlic, shallots etc.). If you’re using beef, tofu, shrimp or chicken as your protein, cook them here to get maximum flavor and color. They are sturdy enough to withstand the boiling broth.

Step 2: Season liberally with all your “Asian-style” pantry goods: soy sauce, dash of rice wine vinegar, green onion, ginger, mirin, seasame oil, lemongrass.

Step 3: Add broth: I mix 1 carton of chicken broth and 1 carton of vegetable broth. Combinations of beef, mushroom or fish stock would be equally as delicious.

Step 4: In separate pot, boil noodles only until tender. Drain and set aside. Ramen – the jerry curl of noodles – is my noodle of choice since they are easier to grip with chopsticks.

Step 5: while the noodles cook, add delicate vegetables: bok choi, spinach, leeks, zucchini and fish: haddock, cod, salmon, halibut etc. and stir gently for about 2 minutes.

Step 6: Add a generous scoop of ramen noodles into the bottom of a pretty bowl then ladle soup making sure to get all the good bits; the vegetables and protein.

Step 7: Garnish with sesame seeds, green onion, hot chili oil, whatever your heart desires.

Filed Under: Dinner, Seafood, Soups & Stews Tagged With: Asian, dinner, food, recipe, seafood, soup, vegetables

A Labor of Love: Chocolate Pomegranate Torte

February 14, 2013 by Eva Louise Leave a Comment

image

“I’m sweet and complicated and difficult…just like love”

Happy Valentine’s Day! Here’s an insanely good recipe from  Fine Cooking  for a chocolate pomegranate  torte to make for your loved one tonight. It’s lusciously chocolaty and combined with the tart burst of juicy flavor from the pomegranate seeds, it’s just short of being…well, orgasmic. 

Admittedly, I find this recipe to be advanced because it has three parts: a torte base, a layer of homemade pomegranate jelly, finished with a ganache glaze.  As the recipe is written now, no lover will doubt your undying love and commitment  if you make them this cake.  Granted, they might find you flustered and sobbing hovered over the saucepan of pomegranate juice mumbling, “Why hasn’t it turned to jelly yet?! Why…why?!” but surely they will appreciate your efforts once the cake is done.  Nothing says “I love you” like a crazed cook in the kitchen.

Despite my praises for this ravishing confection,  I do plan to rewrite this recipe after a few more tries because it’s just too damn complicated for me.  Expect a revised version in the future.

Filed Under: Desserts Tagged With: chocolate, dessert, food, fruit, holiday, love, recipe, valentine's day

Just for the Halibut: Lager-battered Fish Sandwich with Garlic Truffle Fries

February 13, 2013 by Eva Louise 4 Comments

photo (6)This week, Stingray and I made use of two snow-white halibut fillets we had in the freezer (fate of the second fillet to be revealed tomorrow). I was lucky enough to have him make me this outrageous fried fish sandwich for Sunday supper. Despite having a reputation for being the ultimate convenience food, sandwiches are actually a luxury dinner item at our house.  They often require ingredients that we don’t keep on file (bread and sliced cheeses),  and require a keen attention to detail to make them extra tasty (hence why he cooked and I didn’t). Stingray did a basic beer batter for the fish, with classic accompaniments: lettuce, tomato, sliced cheese. He hit it out of the park by buttering and toasting both sides of the bun before serving. I was feeling kind of useless in the kitchen, so my contribution was a  dill aioli and some garlic truffle fries.

For the batter:

  • 1 bottle lager
  • 1 Tbsp baking powder
  • 1/8 tsp ground black pepper
  • Dash cayenne pepper
  • 1 tsp seasoned salt
  • 1 tsp fish seasoning
  • ¾ cup all-purpose flour, plus ½ cup
  • Canola or vegetable oil

1. In a large bowl, mix together the beer, baking powder,  pepper, cayenne pepper, seasoning and salt. Whisk in the flour until the mixture resembles thin pancake batter, add more flour if needed.
2. Fill a medium-sized pan with about a ½ inch of  oil and heat over medium-high until it begins to shimmer. Season the halibut, dredge lightly in the ½ cup of flour (helps the batter to stick), dip it into the batter, and cook the fish until crispy and flaky, 4 to 6 minutes, flipping halfway through. Remove the fillets and rest on paper towel lined plate, pat gently to coax away excess oil.

For the aioli:

  • 3/4 cup mayonnaise
  • 1-2 crushed cloves garlic
  • 1 lemon (juice and zest)
  • 1/2 cup dill, finely chopped
  • s/p to taste
  • 2 T olive oil

Add all ingredients to food processor, blend until smooth.  Taste, and adjust flavors as you like. Smear on toasted buttered buns before stacking fish fillet, cheese, tomato, lettuce.

Garlic Truffle Fries

  • 2 blemish-free Russet potatoes
  • 4 cloves garlic
  • olive oil
  • 4 T finely chopped parseley
  • truffle salt
  • truffle oil
  • s/p to taste

1. Place cookie sheet in oven and crank  to 400. Slice potatoes into long wedges. In a large bowl, coat potato wedges liberally with olive oil. Mix in 2 cloves crushed garlic, 2T parsley, salt and pepper.
2. Distribute potatoes onto hot cookie sheet and bake undisturbed for at least 15 mins before flipping.  Bake for another 15 minutes or until tender and crispy.
3. Before serving, gently toss with remaining 2 cloves of crushed garlic and 2 T parsley, a drizzle of truffle oil and several pinches of truffle salt. Serve and enjoy.

 photo (8)

Filed Under: Dinner, Seafood, Sides Tagged With: bread, cheese, fish, food, halibut, recipe, sandwich

On the (Herb-crusted) Lamb with Mushroom and Leek Bread Pudding

January 2, 2013 by Eva Louise Leave a Comment

lamb1

Herb-crusted lamb with mushroom and leek bread pudding – fast friends that seemed so natural together after just one encounter. The herb-crusted lamb isn’t anything revolutionary (just luscious) but a savory bread pudding?! Totally revolutionary. Inspired by Ina Garten, I actually followed the recipe (!) and it turned out beautifully.

Herb-crusted rack of lamb

adapted from Fine Cooking Magazine

  • 2 racks of lamb, about 1-1/4 lb. each, chine bones removed, rib bones frenched, and meat trimmed of all but a thin layer of fat
  • Kosher salt and freshly ground black pepper
  • 2 cloves garlic, minced
  • 1/4 cup chopped fresh parsley
  • 2 Tbs. chopped fresh thyme
  • 1 cup soft fresh breadcrumbs
  • 1/4 cup olive oil
  • 2 Tbs. Dijon mustard
 

Position an oven rack in the middle of the oven and heat the oven to 475°F. Season the lamb with salt and pepper. Combine the garlic, parsley, thyme, and breadcrumbs in a shallow bowl. Moisten the mixture with enough olive oil to make the mixture hold together.

Heat a large dry skillet over high heat. Put the lamb, meat side down, in the skillet. With tongs, hold the lamb against the skillet for a minute to give it a nice brown crust. Turn the meat to sear it on all sides for a total of 4 minutes. Remove the meat from the skillet and paint the meaty side of the rack with the mustard. Roll the meat in the herb mixture to coat it. Sear and coat the second rack in the same way.

Transfer the racks to a roasting pan just large enough to hold them. Cover the rib bones with strips of foil so they don’t burn and roast until medium rare, 20 to 25 minutes (120-140°F internal temperature). (I forgot cover the bones and smoked out the whole kitchen). If you want a crispier crust, finish cooking under the broiler for 2 minutes. Let the racks rest for 5 minutes before carving.

Use a carving knife to cut between the rib bones. Arrange the chops on warm serving plates. Serve hot. (The chops will cool quickly, so the best strategy is to carve the racks at the table.)

Ina Garten’s Mushroom and Leek Bread pudding

  • 6 cups (1/2-inch-diced) bread cubes from a rustic country loaf, crusts removed
  • 2 tablespoons good olive oil
  • 1 tablespoons unsalted butter
  • 2 ounces pancetta, small-diced (optional)
  • 4 cups sliced leeks, white and light green parts (4 leeks)
  • 1 1/2 pounds cremini mushrooms, stems trimmed and 1/4-inch-sliced
  • 1 tablespoon chopped fresh tarragon leaves
  • 1/4 cup medium or dry sherry
  • Kosher salt and freshly ground black pepper
  • 1/3 cup minced fresh flat-leaf parsley
  • 4 extra-large eggs
  • 1 1/2 cups heavy cream
  • 1 cup chicken stock, preferably homemade
  • 1 1/2 cups grated Gruyere cheese (6 ounces), divided

Preheat the oven to 350 degrees F. Spread the bread cubes on a sheet pan and bake for 15 to 20 minutes, until lightly browned. Set aside.

Meanwhile, heat the oil and butter in a large (12-inch) saute pan over medium heat. Add the pancetta and cook for 5 minutes, until starting to brown. Stir in the leeks and cook over medium heat for 8 to 10 minutes, until the leeks are tender. Stir in the mushrooms, tarragon, sherry, 1 tablespoon salt and 11/2 teaspoons pepper and cook for 10 to 12 minutes, until most of the liquid evaporates, stirring occasionally. Off the heat, stir in the parsley.

In a large mixing bowl, whisk together the eggs, cream, chicken stock and 1 cup of the Gruyere. Add the bread cubes and mushroom mixture, stirring well to combine. Set aside at room temperature for 30 minutes to allow the bread to absorb the liquid. Stir well and pour into a 2 1/2-to-3-quart gratin dish (13 x 9 x 2 inches). Sprinkle with the remaining 1/2 cup Gruyere and bake for 45 to 50 minutes, until the top is browned and the custard is set. Serve hot.

Filed Under: Dinner, Sides Tagged With: cheese, food, herbs, lamb, meat, mushrooms, recipe, vegetables

Primary Sidebar

Don't miss a post!

Enter your email to subscribe and receive notifications of new posts by email.

Welcome

I’m Eva Louise and welcome to Mind in the Butter! This is my food bloggy, showcasing my favorite dishes and recipes often inspired by and cooked for my loved ones. My goal with this blog is to eventually document every single dish I make so when I’m old and stale, I will be able to remember and celebrate memories from my favorite place…the kitchen!

Recent Posts: Mind in the Butter

Shulamit’s Unreal Lasagna with Ground Beef and Spinach

Best-ever 4 minute Instant Pot Rice

Best-ever 4 minute Instant Pot Rice

Seared Scallops and Fennel Risotto

Seared Scallops and Fennel Risotto

Palm Springs: the World’s Best Jetlag Cure

Palm Springs: the World’s Best Jetlag Cure

The Karmic Boomerang is real! New Year, new beginning for me

The Karmic Boomerang is real! New Year, new beginning for me

Copyright © 2023 · Foodie Pro & The Genesis Framework